DIY Fixes \ Microwaves \ How to Replace a Light Bulb for a Microwave Hood

How to Replace a Light Bulb for a Microwave Hood

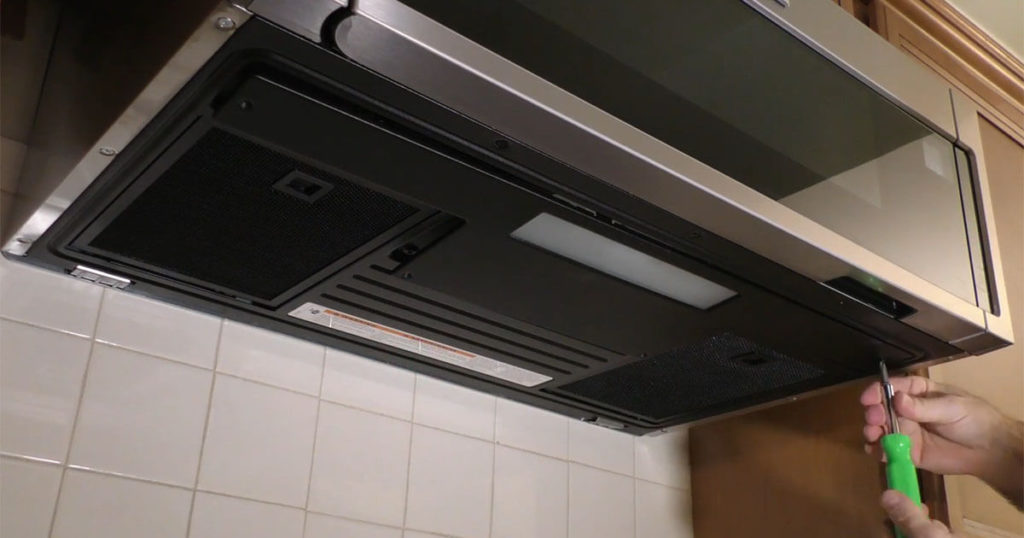
It can be irritating when the light goes out all of a sudden on your fancy over-the-range microwave. However, there’s no need to call an electrician, as you can replace the light bulb for microwave hood combos on your own. It won’t take you more than a few minutes, as long as you have the right tools and parts.

However, if this is your first time replacing it, take your time and read all the steps carefully first. It’s important to learn how to do it right so the next time it’ll be effortless when you have to replace it again.

If you have a Whirlpool® low-profile over-the-range microwave and hood combo, you will need a new LED light. Check the owner’s manual for the right part. For most other over-the-range microwave hoods, you will be using candelabra-base light bulbs (skip to the second set of instructions). Always consult your owner’s manual.

Table of Contents

man unscrewing T-panel

How to Replace LED Lights

Warning: Before you start, you have to unplug the microwave to disconnect the power. Make sure to replace all parts and panels before operating. Failing to do so can result in electrical shock and even death. Always check your Use & Care Guide for instructions.

Tools Needed

  1. Philips head screwdriver
  2. Thick towel

Step-by-Step Guide

Before you start, put the thick towel on your stovetop to protect it. Use the screwdriver to remove the four bolts that are holding the t-panel in place.
You’ll see two metal tabs that are holding the LED light in place. You may need to slightly bend them to loosen the board and slide the LED light out.
Find the small separation and carefully unplug the LED light. If it doesn’t separate, you may need to put your finger in the separation and slightly move it.
Slowly plug in the new LED light.
Slide the new LED light in the slot where you took out the old LED light from.
Use the screwdriver to put the t-panel back in place. You can now plug the microwave back in and test the new LED light. It should be working correctly.

How to Replace Overhead Light Bulbs in a Microwave

Warning: Before you start, unplug the microwave to disconnect the power. You shouldn’t use bulbs that exceed 40W as it can be hazardous. Always check your Use & Care Guide for instructions.

Tools Needed

  1. Philips head screwdriver

Step-by-Step Guide

Use the screwdriver to remove the mounting screws for the bulb cover.
You’ll see two bulbs under the cover. Carefully remove the old bulbs for replacing with new bulbs.

Take your new bulbs and insert them to take the place of the old bulbs.

Replace the bulb cover mounting screws and close the bulb cover. You can now plug the microwave back in and check if the new lights are working.

Practice Makes Easy

You should now be able to replace the light bulb for microwave hood combos even if you’ve never done it before. A final reminder: Don’t forget to unplug your microwave before you start.
If you’ve done everything correctly, but the new lights are not working, you should first check whether you’ve forgotten to plug the microwave back in. If you have, maybe the new bulbs are broken, which can happen sometimes, in which case, you can try another set of new bulbs.
Can't fix it on your own? Trust our certified technicians for service and repairs beyond the manufacturer's warranty. Learn more.
Did you find the article helpful?
You already voted!

Related Articles

Can't fix it on your own? Trust our certified technicians for service and repairs beyond the manufacturer's warranty. Learn more.

Share this article

This will come in handy.

Get monthly answers to household challenges, and more from Appliance Answers and Whirlpool Canada.*

Popular Articles

Gas vs. Electric Dryers

When the time comes to buy a new dryer, you have some decisions to make as far as features and design options but, choosing your

How to Buy a Dryer: The Full Guide

Table of Contents Planning considerations Decide on Your Preferred Set-up Washer and dryer sets can be installed in one of two ways. You can position

Fix it, clean it,
adjust it, love it.

Sign up for monthly tips & tricks and more from Appliance Answers and Whirlpool Canada.*
By closing this message, you consent to our cookies on this device in accordance with our Privacy Notice unless you have disabled them.