DIY Fixes \ Ovens \ How to Replace an Oven Light

How to Replace an Oven Light

Before you replace the oven light, check if it’s the cause of the problem. The oven may have become unplugged, or lost its connection to the power outlet. If your oven’s light does not turn on when you open the door, you may also need to check the switch inside the door.
Similarly, check your user manual or, if available, an online reference guide to get the exact replacement light bulb that will fit the oven. Most often, there will be very little margin for error when selecting a new light bulb.
You should never replace a light bulb or perform maintenance on an oven that is hot or plugged in. Allow the oven to cool down in case of any problems before diagnostics. Always check and follow your appliance use and care instructions before beginning any task, as it should be your primary source of information. If you’re unsure of how to proceed, contact a qualified local technician or a service centre.

How to Remove and Replace Standard Appliance Bulbs (Certain Models):

These instructions generally apply for standard 40W appliance bulbs (and similar):

  1. Turn the oven off and unplug it. If you can’t unplug the appliance (perhaps the outlet is inconveniently placed), switch the breakers or remove fuses from the control panel.
  2. Locate the light bulb, which can be typically found behind a cover or shield, and often at the back of the oven cavity. Remove any bulb cover often by turning it counterclockwise. Some covers only need to be pulled out gently. Refer to your owner’s manual for instructions specific to your model.
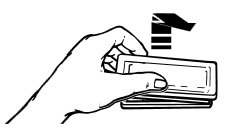
  3. Usually the bulb can be removed from its socket by turning counterclockwise.
  4. Put the new bulb in place and if screwing it in, you can use the mnemonic: “lefty loosey, righty tighty” to remember how to turn.
  5. Replace the bulb cover.
  6. Reconnect power to the oven by undoing Step 1. Most ovens have a control that only turns on the light to check if it’s working.

How to Remove and Replace Halogen Bulbs (Certain Models): Refer to your owner's manual for instructions specific to your model

  1. Disconnect the oven from the electrical network or shut off its breakers or fuses.
  2. Pull the glass cover from the oven to remove it (if your oven has one).
  3. Remove the old bulb from the socket.
  4. Use gloves, paper towels, or a cloth to handle the new bulb while replacing it.
  5. Put the new bulb into the socket.
  6. Snap the glass cover back in place (if your oven has one).
  7. Reconnect the power.
  8. Check to see if the light works.
If the new bulb isn’t working, recheck the connection to the oven or check for underlying problems.
Can't fix it on your own? Trust our certified technicians for service and repairs beyond the manufacturer's warranty. Learn more.
Did you find the article helpful?
You already voted!

Related Articles

Can't fix it on your own? Trust our certified technicians for service and repairs beyond the manufacturer's warranty. Learn more.

Share this article

This will come in handy.

Get monthly answers to household challenges, and more from Appliance Answers and Whirlpool Canada.*

Popular Articles

Gas vs. Electric Dryers

When the time comes to buy a new dryer, you have some decisions to make as far as features and design options but, choosing your

How to Buy a Dryer: The Full Guide

Table of Contents Planning considerations Decide on Your Preferred Set-up Washer and dryer sets can be installed in one of two ways. You can position

Fix it, clean it,
adjust it, love it.

Sign up for monthly tips & tricks and more from Appliance Answers and Whirlpool Canada.*
By closing this message, you consent to our cookies on this device in accordance with our Privacy Notice unless you have disabled them.