Usage Tips \ How To Use a KitchenAid® Food Processor: A Detailed Guide

How To Use a KitchenAid® Food Processor: A Detailed Guide

You can instantly increase your culinary options with a food processor in your kitchen. This one appliance lets you chop, dice, puree, slice, and much more, so you can spend more time perfecting your culinary creations. Knowing how to use a food processor opens up a world of possibilities far beyond basic food preparation.

There are many food processor brands to choose from, so we decided to focus on a front runner in the market: KitchenAid®. If you want more information, please refer to your model guide when reading the article.

How to Set Up a Food Processor

Putting your food processor together is straightforward. Installation of newer models is a breeze: just line up the components and you’re ready to go. These models also have hinged work bowl lids that flip over and lock to create a seal, and do not require twisting. Here are some general tips for setting up a food processor; however, you should consult the manual for your appliance for specific instructions.

Step 1. Position The Base

Among the heaviest parts of the food processor is the motor. Make sure your food processor is placed on a stable, flat surface.

Step 2. Secure The Work Bowl

This is a clear plastic container that attaches to the base of your food processor. They come in different sizes, depending on the capacity of your food processor. For example, KitchenAid® makes models varying from 3.5 or 5 Cup Food Choppers, 7 Cup and 9 Cup, full-size food processors, and even 13 Cup larger capacity models.
Your food processor will not function if the bowl is not properly attached and locked in place. Watch this video for quick instructions on how to put together food processors.

When using old models, align your bowl at approximately 90 degrees from the insertion point, then twist it until it falls onto the base and locks in place.

No matter whether you’re looking to upgrade to a larger model or one that is simpler to set up, there are several food processors available that can meet your needs.

Step 3. Insert The Drive Adapter

The blades and discs of most food processors slide over a removable drive shaft adapter. Place the drive adapter in the work bowl onto the built-in drive pin. Drive adapters do not lock or click into place; they are simply lowered onto drive pins without being pushed or twisted.

Step 4. Select A Blade

Slicer or Shredder Disc:

Food processors up to 7 cups come with a reversible slicer and shredding/grating disc or multiple discs for thicker or thinner slices. These adaptors are installed by sliding them over the central drive pin of your machine and pushing them all the way down. In the case of a blade with finger grip holes, you can hold the disc by its center or grip it with the holes on the blade. Use the hole in the center of the disc to attach the disc to the drive shaft adapter. The drive adapter will rest on rather than go into the work bowl.

Multi-purpose or “S” blade:

This classic food processor blade fits over the drive pin in the middle of the bowl and base. There are two razor sharp blades in the middle of the shaft. The blade locks into place when downward pressure is applied to certain models, such as the 3.5 or 5 cup food choppers. The drive adapter can be attached over the pin on larger KitchenAid models: then slide the multi-purpose blade over the adapter and push down as much as possible.

Dough Blade:

Some food processors have a dough blade that can be used when kneading dough or performing similar tasks.The blade does not have sharp edges, so it facilitates the kneading process rather than chopping or slicing. This blade attaches to the handle in the same way as the multi-purpose blade.

Step 5. Attach Work Bowl Cover

The clear plastic lid allows you to attach the blades of your choice to your work bowl. Food processors need to have their lids secured to the bowl in order to function. With most newer KitchenAid® Food Processor models, the lid is hinged to the work bowl. You can simply flip it over the bowl, and then lock it with the locking tab to seal it. The lid on older models must be placed on the bowl before being twisted into place.

Step 6. Insert Food Pusher, If Applicable

Large food processors feed ingredients slowly to the blades via a feed tube. Ensure that the feed tube is filled to the top with food. In some models, the food pusher can click into place when it is inserted. In some cases, a food processor won’t work without a food pusher attached, even if you don’t plan on using it.

Operating a Food Processor

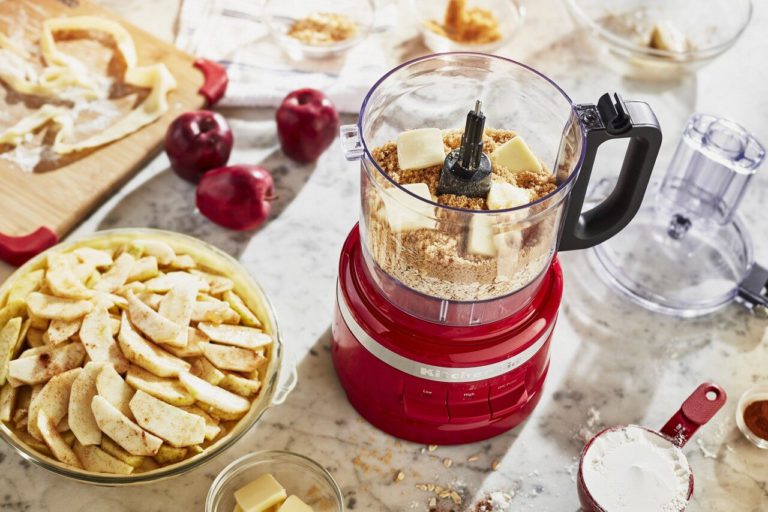
Having assembled your food processor for chopping, pureeing, slicing, shredding, and mixing, you’re almost ready to make culinary magic. When putting uncooked meat or vegetables, such as carrots, celery, potatoes or squash, into a food processor, cut them into 1-2 inch pieces. Doing so can ensure the best results.

Refer to your manual for details about your food processor. In addition to a pulse function, KitchenAid food choppers with 3.5 and 5 cup capacities have a lever that slides from chop to puree. Three buttons are available on larger models, such as the 7 cup and 9 cup, for varying speeds and pulses.

When you press the pulse button briefly, the food processor can be operated in short bursts. By checking the contents of the bowl after each burst, you can ensure that your coarse chop does not turn into a paste.

Upon pressing the low-speed button, the device will operate at that speed until it is pressed again to stop it.

Guide To Chopping And Mincing

The most common use of a food processor is to chop vegetables, which makes it a great way to elevate your cooking routine. Some smaller food choppers only come with a multi-purpose blade.

Step 1. Remove Work Bowl Lid

Remove the lid and any accessories that might have been inside the bowl.

Step 2. Attach Blade

Follow the instructions for attaching the multi-purpose blade to your work bowl.

Step 3. Combine Ingredients

In the work bowl, mix the ingredients together evenly. Don’t fill it more than halfway.

Step 4. Connect The Lid

Attach and lock the lid. If applicable, insert the food pusher fully.

Step 5. Start With Pulses

Pulse 2-3 times quickly to start chopping.

Step 6. Select Your Speed

Vegetables should be processed at low speed, and nuts or firmer ingredients should be processed at high speed. Chop to the desired consistency with pulses. Do not overprocess, or you will get a puree.

Guide To Pureeing

Are you ready to puree using a food processor? Pureed vegetables or fruits are made the same way as chopped vegetables or fruits, except that they are processed longer.

Step 1. Remove Work Bowl Lid

Remove the lid and any other accessories from the bowl.

Step 2. Attach Blade

Follow the instructions to place your multi-purpose blade in the centre of your work bowl.

Step 3. Combine Ingredients

Add your ingredients to the bowl evenly. Fill the bowl no more than 2/3 full.

Step 4. Secure The Lid

Secure the lid by attaching and locking it. Insert the food pusher fully, if applicable.

Step 5. Let The Processor Run

Rather than pulsing, this time you will simply let the food processor run continuously. Use the low speed for vegetables and the high speed for nuts or firmer ingredients. Process until the right consistency is achieved.

Step 6. Add Ingredients In Waves

If you have a large amount, you may want to start with a small amount and add more slowly through the tube. Move the food into the bowl using the food pusher.

Guide To Shredding Or Grating

Using your food processor, for example, you can shred cabbage or other items by using its reversible slicing/shredding disc. Tip: Foods shred better when they’re cold. Store them in the refrigerator until you are ready to shred them.

Step 1. Remove Work Bowl Lid

If the multi-purpose blade is installed, take off the lid and remove the blade from the bowl.

Step 2. Adjust The Adapter

Push the drive adapter over the centre pin.

Step 3. Select Disc

To slice or shred, select which side of the reversible disc you want to use. Make sure the shredding side is facing up.

Step 4. Attach Disc And Work Bowl Lid

Lock the disc into place by attaching it to the top of the adapter. Be sure that the blade is flush with the work bowl top. Attach the lid and secure it.

Step 5. Add Ingredients

Place food in the tube. If your food processor has several different-sized feed tubes, choose the one that best matches the size or cut of the food you’re processing.

Step 6. Choose Speed

Set the machine to the speed you desire.

Step 7. Push Food Into The Tube Using The Food Pusher

Push the food evenly and firmly onto the blade once it is in the tube. After passing through the blade, shredded food falls into the work bowl. The food pusher must always be used to push the food onto the blade.

Slice

You can slice meats such as salami and pepperoni, cheese, and hard fruits and vegetables with the disc.

Step 1. Remove Work Bowl Lid

Remove the lid and multi-purpose blade from the bowl if installed.

Step 2. Adjust The Adapter

Push the drive adapter over the center pin.

Step 3. Select Disc

Select the side of the reversible disc you want to use. It is best to slice with the sharp blade edge facing up.

Step 4. Attach Disc And Work Bowl Lid

Slide the slicer disc onto the top of the drive adapter and lock it into place. It is crucial that the disc sits level with the bowl. Attach the lid to the work bowl and lock it securely.

Step 5. Prep Food

Position the food so that it is sliced in the tube. Food processor tubes and pushers will vary depending on the size of foods you are slicing.

Step 6. Select A Speed

The machine can now be set to your preferred speed.

Step 7. Push Food Into The Tube Using The Food Pusher

Press evenly and firmly on the food in the tube so that it moves toward the rotating blade. The slices fall into the bowl after passing through the blade. Insert the food pusher completely, if necessary. It is always best to push the food into the blade using a food pusher.

Guide To Kneading

With the right food processor, you can knead yeast dough with plastic dough blades. You can technically knead dough with the metal multi-purpose blade on your food processor, but you’ll have to watch it closely. Food processors and metal blades can kill yeast in your dough, making it impossible for bread to rise. The best option is to use a dough blade. If you’re using a metal blade, reduce the kneading time by about a third.

The installation of dough blades is very similar to that of multi-purpose blades. You can knead with your food processor by following these steps:

Step 1. Add Dry Ingredients

Pulse the dry ingredients 3-4 times in the bowl to mix them.

Step 2. Prepare Yeast

Proof the yeast in a separate cup.

Step 3. Add Wet Ingredients

Mix wet ingredients into the dry ingredients, already in the bowl, through the food processor’s food tube.

Step 4. Begin Pulsing

Pour the remainder of the water into the food tube after about three seconds.

Step 5. Increase The Speed

After about 20 seconds, the dough will form if the food processor is set to high speed.

Step 6. Turn The Dough

You’ll need to turn off the processor, unplug it, and remove the lid. Sift the flour over the ball and set it aside. Turn the dough ball over so that the bottom (which is usually warmer) becomes the top.

Step 7. Continue Pulsing

Re-attach the lid, plug in and pulse for another 20-30 seconds.

Step 8. Remove Dough

Take the lid and blade off the machine, and remove the dough ball from the bowl. Hand-knead the dough for about 30 seconds.

Step 9. Allow The Dough To Rise

Allow the dough to rise for about 45 minutes after you divide it in two, coat it lightly with olive oil, and return it to your work bowl (or another bowl of your choice).

Guide To Mixing

Besides cutting butter into flour, your food processor can be useful for combining butter and sugar. If you want to fold chocolate chips into cannoli cream or create great sauces and dressings, this is the tool for you. In large food processors or appliances with drizzle basins, you can add liquids through the food tube or slowly at the bottom of the work bowl while it runs. Making your own homemade mayonnaise and aioli is easy if you have the right ingredients.

Following the same procedure as for chopping, you mix, but for a shorter period of time. Use quick pulses and many checks to be sure you’re not overdoing it. People often use dull-edged dough blades when cutting butter to avoid adding heat to the process.

How To Clean & Store Your Food Processor

It’s best to clean your food processor right after you’ve used it. If you have dried or caked food in your bowl or blades, it is harder to remove.

Follow these instructions to clean your food processor:

  1. Remove the lid, the blade, and the bowl of the food processor. You may need to rotate the bowl on some models in order to unlock it.
  1. Cleaning the base and cord:
    • Take a damp cloth and wipe the cord and base with warm water. Ensure that you dry the cord and base completely. Avoid using scouring pads and abrasive cleaners. Avoid submerging the base in liquids.
  1. Cleaning the bowl, lid, and blades:
    • In most food processors, the lid, bowl, and blades are dishwasher safe. If in doubt, check the manual for your machine. Avoid laying the bowl on its side in the dishwasher; upside down on the top rack is best. Use normal or gentle dishwashing cycles. Avoid cycles with high temperatures.
    • Use a soft cloth or sponge when you wash food processor parts by hand. Use warm soapy water. You should not use abrasive cleaners or scouring pads. There is a risk that they will scratch or cloud the bowl and cover.
    • For a quick and easy clean, you can simply fill the bowl ⅓ full with water, add a few drops of dishwashing liquid, and run the food processor on high for 30 seconds.
  1. After washing, dry all parts thoroughly. Most KitchenAid® food processors, such as the KitchenAid® 9 Cup Food Processor and the 7 Cup Food Processor Plus, allow you to keep the blades, drive adapter and discs inside the work bowl for compact storage.
  1. If you keep your food processor on a shelf or in a cabinet, wrap the power cord around the cord storage (if any) or around the base itself.

The Many Uses For A Food Processor

You can use a food processor for everything from chopping veggies for ratatouille to chopping mirepoix for soup bases. Maybe you want to make healthy date-nut desserts that are flourless.

Food processors can be used for many different things, including making buttery, flaky pie crusts or fluffy, chewy pizza dough, or even pesto, guacamole, pico de gallo or hummus.

Discover a full lineup of food processors and choppers and choose the one that fits your needs.

Can't find an answer? Trust the Appliance Pros for certified services. Schedule appointment.
Did you find the article helpful?
You already voted!

Related Articles

Can't find an answer? Trust the Appliance Pros for certified services. Schedule appointment.

Share this article

This will come in handy.

Get monthly answers to household challenges, and more from Appliance Answers and Whirlpool Canada.*

Popular Articles

Gas vs. Electric Dryers

When the time comes to buy a new dryer, you have some decisions to make as far as features and design options but, choosing your

How to Buy a Dryer: The Full Guide

Table of Contents Planning considerations Decide on Your Preferred Set-up Washer and dryer sets can be installed in one of two ways. You can position

Fix it, clean it,
adjust it, love it.

Sign up for monthly tips & tricks and more from Appliance Answers and Whirlpool Canada.*
By closing this message, you consent to our cookies on this device in accordance with our Privacy Notice unless you have disabled them.